Wednesday, January 23, 2013

Braided Crocheted Scarf

UPDATE: My scarves are now for sale on Etsy! Check out my shop and buy a custom or pre-made scarf by me! 

First time I'm showing my face on here! So, I really like this scarf. It was super quick to make and a twist on normal scarves! I got the idea from a pin from the blog Baby Night Night Crafts
I didn't make a pictured tutorial for this one but I will tell you the pattern is:

Start with some chain stitches 
(depends on your desired length) I have a loose stitch so I believe I made around 60-100
Double crochet back onto the chain
Repeat for a total of five rows of double crochets(not including chain)
x3
Take your three "mini scarves" and braid them together (I braided them rather loosely!)Then sew your ends to make it an infinity and you're all set! I want to try three different colors next!


New Green Sneaks


These shoes were a total experiment. I spotted them at a thrift store and decided that since they fit, were clean, and were an interesting olive color I would buy them for the $1 they cost me. It took me awhile to decide what to do with them, but when I bought this rust colored glitter I thought since the colors went well together I would put them together. I documented the process in the form of a tutorial so if you have a similar pair of shoes you'd like to do this with feel free to follow along. 

Materials:
Shoes (mine are vinyl.. a smooth materials. I don't know how this would work with different material shoes)
Mod Podge
Mod Podge acrylic sealing spray
Glitter (super fine)
Sheet of paper
Sponge


First take your sponge and spread a thin layer of mod podge over the part of the shoe you want to add glitter to. 


Make sure you sprinkle the glitter on over the piece of paper in order to save the excess. Otherwise you will waste 90% of your glitter. 


Once this layer dries it should look like this.


Then grab the next part f the show you want to glitter. I chose the tongue, which was somewhat complicated to grasp while adding mod podge and glitter. 


This is how I added the mod podge


This is what it looks like after I added glitter and emptied the excess on the paper. 


This is what it looks like with the first layer of the main shoe and the tongue done. 


After I let everything dry I added another layer of glitter to each shoe *not on the tongue*


After those layers dried I sprayed them with mod podge acrylic sealer. It will seal the shoes because mod podge original is water soluble. Once you spray the sealer they will be wearable outside. Follow the instructions on the can for ventilation and so forth. 

And there you have it! An updated pair of shoes. I think my favorite part is the tongue. Even though it's not always visible because I wear bootcut jeans.  Here's another picture of me lounging in them, feet up! :) 


Thanks for reading! 


Monday, January 21, 2013

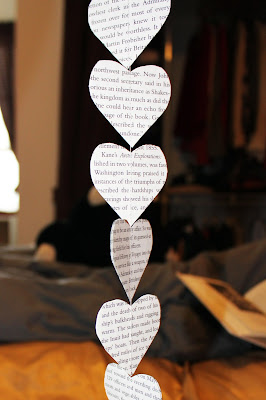
Hanging Heart Paper Garland


On my day off of school on Martin Luther King, Jr. Day I decided to try making some heart garland. I decided to use them as window treatments for my nook. I made 7 strings in differing lengths. If you'd like to know how to make these, read on for my tutorial! 

Materials
Old book, or pages of a book, or whatever paper you'd like to use
Heart stencil (mine is made from a note-card)
Pen or Pencil
Thread
Scissors
Sewing Machine

1: Start by choosing the pages you want to use. If they are in a book or notebook cut the pages out as close to the binding as possible. 

2: Gather 4-5 sheets of paper at a time and use your heart stencil to trace as many hearts as you can fit on a page. I only wanted hearts with words so I kept the hearts in the middle of my pages. 

3: Cut your hearts out. Put them in piles of two - You will be sewing them together this way to create the double heart effect. 

4: Put your first set of hearts under the foot of your sewing machine and begin to sew. You can back stitch, but it isn't necessary. Make sure to leave some loose thread at the top in order to tie your strands to a curtain rod.

5: Continue to sew the hearts one after another together. I ranged my strands from 14-20 hearts. This will depend on how long you want your strands and how big your hearts are. 

6: Cut the thread from the bottom of the last heart and untangle your strand. It should look like this.

7: Bend each heart on the string away from each other to create the double heart effect. Gently do this- do not press extremely hard, just press lightly to separate them. Do this as many times as you like! That's it! Here are some more pictures of my final product.


Sunday, January 20, 2013

Damask Bow Pillow


This was my first try at making one of those "Bow" pillows with the stretched bow all the way across the body of the pillow. ALSO! It is my first attempt to do a picture tutorial. I hope that if you want to follow along or try it yourself these pictures and instructions make sense :) Scroll down for the tutorial. 
I think this pillow turned our great! I do think it may have been better to double the thickness of the bow so it isn't so thin, as it blends into the pillow quite well. Haha. Maybe using a different fabric for the bow would avoid this issue. If you have any suggestions or questions leave a comment below! Thanks for looking :)

Note* Remember you can click on each picture set for a larger image! 

Materials
Pictured: 
2" x 4" piece of fabric (small)
13" x 5" piece of fabric (medium)
Two 13" x 13" pieces of fabric (large)
Scissors
Filling
 Not Pictured:
Pins
Sewing Machine (or patience with hand sewing)
Needle
Thread to match your fabric

PART 1: The Knot/Loop
(I numbered this part because there are a lot of steps)
1. Lay your small piece of fabric on your work space
2. Fold it in half hot dog style and pin it to stay
3. Sew along the open edge
4. Flip your tube inside out
5. Lay your fabric down so the seam is in the middle on top of your fabric
6. Fold it hot dog style so the SEAM SHOWS
7. Sew it together
8. Flip it inside out
9. Done

PART 2: The Bow
Now take your medium piece of fabric
Pinch it to create the center of a bow
Use the pins to hold it in place while you slid the loop you just made around the bow
** If the loop isn't snug enough to hold the bow's shape, take it off, flip it back inside out, sew the seam closer, clip the extra fabric, and turn inside out again until it fits!**


PART 3: Sew the Bow Down
Now take your bow and lay it on one of the big pieces of fabric.
Make sure it is the pattern direction you want it to be in. 
Pin the edges down tight on both sides.
Sew the bow onto the fabric on the edges.

PART 4: Form the Pillow
**Not pictured**
Lay your to large pieces of fabric (one containing the bow) front to front so the pattern (what will be the outside of the pillow) is hidden. Make sure your patterns are both facing the way they need to be so when the pillow is flipped inside out it is correct direction and alignment. 


Sew all but one of your edges together- on the last one leave enough room to be able to stuff your pillow.
Flip it inside out *mind your bow!*
Stuff with stuffing
Fold under the rough edges on the unsewn seam and pin together.
Sew as close to the crease as you can with your sewing machine or hand. 

That's it! You're done :) Now admire your work!


Hair Bow for Under Sock/Messy Buns


So I was bored on my Sunday afternoon and started rifling through my Pinboard for inspiration for projects to do that required me to use my brand new sewing machine! I found a tutorial for a hairbow and thought, why not? So, I used some scrap fabric I had from my heart garland and made one. I think it turned out nice. It's probably not that versatile considering the pattern, and I might want it to be a little bit bigger, but for a first run I think I did pretty well. The fabric I used is a flannel material. The tutorial called to use a stiff material, but I went with the flannel instead. *Once I finished this I tried the tutorial with some canvas material and I think it's too stiff, so I actually think that any material would be fine (because it's folded twice and then bunched.. It's got pretty good shape). Anyways I will link the tutorial HERE! Ironically her blog is called "Rookie" :) Hope you guys like it. Total cost of project is nothing since I used scraps! All you need is thread and fabric, and my fabric only cost about 50 cents. I'd say you can make this pretty cheap ;)